This is a general post about vests, sashes, badges, patches, and pins. And how to make sense of it all, and how to make it all fit. If you have a suggestion, or if you have tried one of the suggestions here and had a different experience than I did, please post a comment! Hope some of this might help.
Note: This covers Daisies and Brownies, but the gist is the same for upper levels. You'll have to ask your council or Google for specific patches/badges for upper levels.
Which to Buy: Tunic or Vest (Daisies)?
Some of the girls who wore tunics said they weren't comfortable (especially putting them on and taking them off). But all the ones who wore vests said those were fine. One little girl had a growth spurt mid year and her tunic was obviously too small. Another had a growth spurt and her vest was shorter, but still fit fine. One girl had the smallest sized vest they make, and it was huge on her.
While I personally like the look of the tunics better than the vests, in terms of the Daisy badge designs (petals), I think the vests are more accommodating in terms of comfort, so that's what I recommend. Doesn't matter to me though if the parents or girls choose a tunic instead. It's up to them. But when it comes to sashes . . .
Which to Buy: Vest or Sash (Brownies and Up)?
Vest! Definitely buy the vest, if you can afford it. Someone asked me recently why I'm so adamant about recommending vests over sashes.
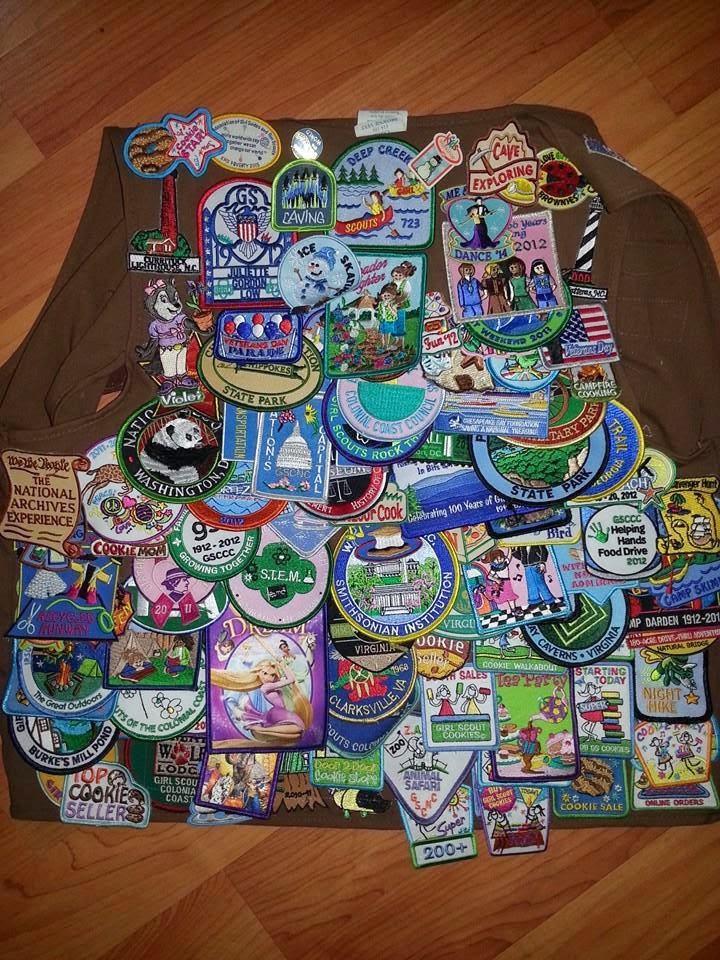
Here's a picture that pretty much sums up why I'm not a fan of sashes:
This is an absolutely adorable, precious little Girl Scout, and I love her bunches.
And her mom tried, really she did. But this sash? It's a hot mess.
So here it is, in no particular order, why I prefer vests over sashes:
- Vests are more comfortable for the girls to wear, typically.
- Sashes twist and "roll" around (front to back and vice versa), so you often have to literally pin it to the shirt to keep it in place. (Also, holes in shirts, ugh.)
- Insignia tabs on t-shirts? Not terribly handy (yes I know, they should technically be wearing their white polo-style shirts, but we meet right after school on art day. I'm not sending my child to school on art day wearing a white shirt. Sorry. Not happening).
- Having the insignia already attached to the vest solves the never-ending issue of WHERE DID THE TAB GO? And prevents pins from getting lost or destroyed in the washer/dryer accidentally.
- Vests hold more patches, period. They just do.
- Sashes don't work as well on short torsos, in my experience, because they tend to be long (though why GSUSA doesn't give us a "Tall" option for vests, I haven't a clue. They totally should. I really shouldn't complain though. At least the vests aren't as short as they used to be).

Randomly Googled image of old-style Brownie vest. Look how short it is!
Still, sashes are cheaper. A LOT cheaper. And some people don't mind the pin thing. And some girls prefer the look of a sash. I think for a lot of folks though, the cost is the bottom line, especially if uniforms are paid for with troop funds. But in our troop, parents typically pay for uniforms (councils vary on financial assistance with uniforms. Check with yours).
So while I encourage my parents to purchase vests, on occasion we do have a child show up in a sash. And that's fine! Though it pains me to see any uniform with patches, pins, and badges all mish-mashed together. So I tell my parents that I am VERY HAPPY to help with patches and uniforms if they have questions, or need assistance. As a result, I often sew on patches and badges for my parents. I'm cool with that. I like to sew.
And frankly, I'm just thrilled when the girls are in uniform at all, honestly. But it's tough enough finding room on the back of a vest for all the fun patches we earn (we have a LOT of service unit events). I can't imagine trying to make it work for a sash.
I've had other leaders tell me their girls chose a sash, then by the end of the first year in Brownies, the sashes were full, so they had to buy a second one.
The cost of one vest is still more than two sashes, though. If money is an issue, get the sash. You can make it work. But in the end, a vest is more accommodating.
Another randomly Googled image of two sashes, criss-crossed. Wonder what the front looks like?
So there you have it. It's just my personal opinion. I don't require my girls to be in full uniform. I encourage them to wear a white shirt and khaki bottoms with their vest or sash for formal events, but a vest over everyday clothes is plenty for me. Thank goodness there are no uniform police. ;)
And in the end, as with everything, you do what is best for your troop. If your parents cannot afford vests, but can afford sashes, by all means go with a sash! Just be prepared to get creative.
Badges Versus Patches
The difference between a badge and a patch is this: Badges are official, and level- and/or council-based. They go on the front of a vest (or sash). These typically have steps that must be completed to earn them.
Patches may be official (council), they may also have set guidelines to complete in order to earn, but they go on the back, with other fun patches.
What are Fun Patches?
Fun patches fall into a couple of categories including:
1. GS-related, general (no participation required; these are pro-GS type patches)
2. Activity- and/or event-based (participation/attendance typically required)
3. Independent (any requirements determined by troop and/or leader)
See
this post for more info, including my personal take on fun patches in general.
The bottom line is fun patches go on the back of the vest, or somewhere else completely, but never on the front of a vest or sash. If you run out of room on the vest/sash, you can put patches on a backpack, satchel, hat, sweatshirt, jacket, blanket, etc. I've even seen people put them on the back of their Build-A-Bear GS bear. :)
You can also put official badges on a blanket or something as a keepsake, after your daughter has moved up. I've seen pillows and quilts made from old vests, and blankets made from patches sewn onto the fabric. There are great ideas all over
Pinterest on what to do with old vests. Or just use Google for some inspiration.
What About Council's Own?
These can get confusing, because oftentimes there are steps that must be completed to earn one, yet it's not always an official badge. Sometimes it's just a fun patch that happens to have "official" steps for completion. But sometimes it is an official badge (steps required), and goes on the front.
Ask your council before working on its patch, to make sure you know where it goes.
World Thinking Day?
Yep, it's official, as long as the requirements for earning it are completed. Stick it on the front,
per GSUSA.
What About Retired Badges, Like Try-Its?
Yes! These are still official, earned badges, even though they're retired and not sold in most council stores any more. These badges go on the front of the vest. It's okay to have Legacy, Cookie Business, Financial Literacy, Skill-Building, and Try-Its all mixed in. It's entirely up to you. As long as they're on the front, and were earned, they're fine.
So Where Do The Official Badges Go on a Vest, Exactly?
Typically, Legacy and Cookie badges go on the same side as troop numbers. Journeys go in their pre-arranged design on the same side as the insignia tab. Skill-Building typically go under the Journeys. Try-Its can go on either side, mixed in or separate (depends on where you have room). But the Journeys start up in the middle-ish area on the insignia tab side. Overflow Legacy, Skill-Building, etc., go beneath on the same side.
What About the 100th Anniversary Pin?
There are several views on this pin, so I called GSUSA and asked. Keep in mind that even that isn't the "final" word on it, though, as I bet if I called back and spoke with someone else, I might get a different answer. ;) However, this is as official an answer as I could find:
The 100th Anniversary pin is worn by girls or adults who were members in 2012. For girls, the pin goes on the front of the vest, above the insignia tab (not on the tab itself). If a girl was a member in 2012, she may (according to the nice lady at GSUSA) wear her pin on each vest, as long as she likes. So, just like the membership stars, JGL Birthplace, and cookie pins, etc., the 100 pin can be moved up with each new level/vest.
Supposedly only those who were members in 2012 can wear this pin.
Daisy 30th Anniversary Pin?
2014 marked the 30th anniversary of Girl Scout Daisies. GSUSA released a limited edition pin to mark the occasion. This pin is official, and is worn in the same place as the 100 Year pin, if the girl was not a member in 2012, or beside the 100 Year pin if she was. Any registered GS may wear the Daisy Anniversary pin on the front of her vest. However, they are very hard to find! Check with your local council shop, search online, and try eBay if all else fails.
This pin, like the 100 Year one, can be moved up with new levels.
There are also 30th Anniversary patches available to mark this occasion. Any GS may wear this patch on the back of her vest.
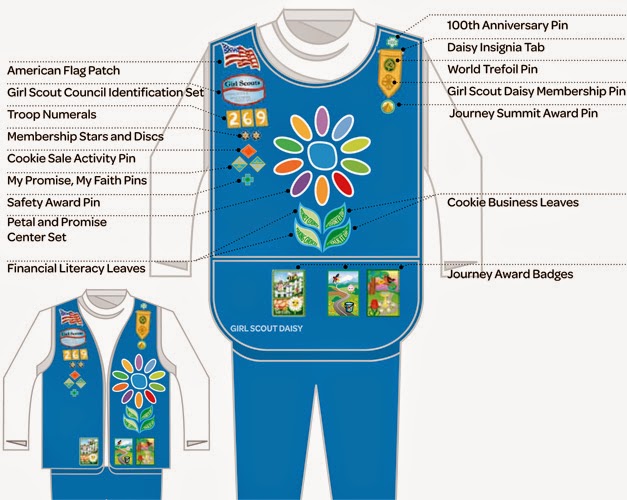
The official where to put stuff picture; doesn't have everything, but it's a good reference
JGL Birthplace Pin . . . what is that?
This pin is an official pin that may be worn by GS members (girl and adult) who have toured the JGL house in Savannah, GA. It is to be worn beneath the membership stars, according to the little handout we were given at the Birthplace. However, there wasn't room on my daughter's vest for it to go there, so instead we put it under her troop number, because there was space beside the membership stars.
Ignore the upside-down membership disc thing. I could use a glue dot to hold it in place but eh.
It used to be that this official pin, and the Friendship pin, which can be worn by those who did not tour the JGL House, were to be worn beside the troop numbers, rather than beneath them. I imagine they changed it because so many troops have longer troop numbers now than in years past.
Anyway, The JGL tour pin is official, and can be moved up. The current version is the one with the daisy on it. The JGL gate (far right in image above) is the current Friendship pin. Traditionally this is worn for one year, then passed on to another GS, or retired and worn as a casual pin not on the vest (stick it on your shirt collar!), or worn on the back of the vest after it's been worn on the front for one year. I'm not sure what the history is behind why it is only to be worn for a year, but there you have it. Isn't it pretty? I love the gate design.
Edit: Please note, pins on the back of vests can be uncomfortable when you lean against a chair. A good compromise to not wearing "unofficial" pins on the front is to wear them on the collar of the white polo shirt worn underneath the vest.
Adult Uniform and Pins
Speaking of JGL pins, adults should wear the JGL (and/or Friendship) pin across from insignia tab (opposite side of shirt). So if you're looking at the adult uniform shirt, the tab is on the right. The JGL pin goes on the left, under your name tag if you have one.
The 100 pin goes above insignia tab (if you were a GS member/volunteer in 2012). Volunteer level pin (like
this or
this, etc.) goes beside the 100 pin. Both are pinned directly to the shirt, above the insignia tab.
The insignia tab looks like this:
An old picture of my adult uniform shirt and insignia with pins
I actually found my original membership pin recently (that's my original WAGGGS pin from the 70s in the picture above), and replaced the newer one with my original (totally legit to do this, by the way). Also, I need to get an SU bar but I keep forgetting. If you have two bars (the yellow is my leader bar), you can put one atop the other. Typically the leader bar goes above any other bar, because "service to the girls comes first." But if you have lots of bars, you may wear only two (one above the other -- not side by side) on the insignia tab. If you aren't wearing a tab, you may wear two bars side by side.
Used to be that the Volunteer pin went on the same side as name tag (opposite the insignia tab). Not anymore. It now goes above the tab. You can choose a level-specific Volunteer pin, or the generic Volunteer pin. Since I have Daisies and Brownies, I wear the generic Volunteer one.
EDIT: Some councils are retiring the generic Volunteer pin, I've heard. Grab one now before they're gone!
I have a Friendship pin from way back when too. It is not the same as what you find now at JGL Birthplace. It was something you could buy from GS and it was worn on a shirt collar or lapel, not on the actual uniform. I wear mine on my uniform shirt collar, on the same side as the name tag.
Stock image found via Google. But mine looks very similar. It's about the size of a dime.
Name Tag? I Want a Name Tag! Where Do I Get One?
Check your council store. If they don't have them, go to eBay. That's where I found mine.
Name tags are not required. Check your council for your "official" uniform. Ours is navy polo, WAGGGS and membership pins, and khaki bottoms. Some are fancier. Some are not.
I Have My Great-Aunt's/Grandmother's/Random Relative's Gold Award. Can I Wear It?
Did you earn it? No? Then can you wear it as an official pin? Technically, no. As an heirloom? I vote why not (in an altered form; for instance, you could have it made into a pendant or a ring, if it's real gold). Again, there are no uniform police for Girl Scouts. However, the Gold Award should technically only be worn by those who've earned it (there used to be mother pins, as I recall --
oh yeah, here's one -- it's a miniature version; I can research those a bit more if anyone's interested).
If I'd earned the Gold Award, I'd wear an antique, real gold pin if I had one. But I didn't earn it. And I don't have one. If I did, I'd save it for my daughters, in case one of them earned it. I wouldn't have it turned into a pendant or ring. I'd keep it, as is, in case I one day had an heir who liked old stuff as much as I do (and happened to earn it).
What About Patches and Vests for Leaders?
Wouldn't it be great if leaders had vests too? While GSUSA does not officially sanction an adult vest, there are some available at various councils online. Some leaders might not like the idea of "girl-specific" badges or patches going anywhere but on a girl uniform, but (just to play devil's advocate) aren't we paid members too? Don't we earn them as much as the girls? Still, I can understand both sides. I'll leave it up to you. Personally, I think a vest would be far more easily identifiable in terms of "I am a Girl Scout leader" than a scarf or a polo shirt.
But that's because I'm more of a vest kind of gal than a silk scarf with business suit person. Your mileage may vary, obviously. ;) But I think it's good for leaders to wear some kind of GS-related clothing when attending troop meetings. (I wear lots of GS t-shirts to our meetings.) And again, check with your council for what to wear on formal occasions.
Here's
one site that carries leader vests.
I don't have a vest. I have a vest now! I ordered it from
this council shop. I love it. So do my girls! (Please note, these vests seem to run large.)
I still have my First Aid backpack that I bring to all troop meetings and events. And it is covered in fun patches (and I also have some badges I earned as a Brownie on there. It is absolutely FINE -- according to the nice lady at GSUSA -- to display patches and badges you earned as a GS on a backpack or a jacket or whatever. They're yours. You earned them!). Some leaders have jackets or sweatshirts they put fun patches on. Some think it's perfectly silly and don't want to bother with it at all. It's entirely up to you.
EDIT: I've kind of started collecting patches (ha!). I'm thinking I'm going to end up with patch blankets for my daughters . . . and me. Scroll down for more info on blankets.
I would have bought a vest if I hadn't already started putting them on my backpack. Check with your council, if you want to wear a vest.
Here's one awesome looking leader vest, though, for those who are interested:
She puts fun patches on the back, too!
Enough About Adult Stuff. My Daughter's Vest Is FULL! What Do I Do Now?
If you cannot rearrange badges so they all fit, then you might just have to buy a sash or second vest. Technically, as I understand it, all sashes/vests should have the required troop and council identification patches on them, even if it's a second one. Check with your council.
However, one clever poster said she purchased a sash (same material as vest), then clipped the seam, and sewed it around the bottom of the vest to extend the vest length. I'm pretty sure somewhere someone might fuss about making alterations to the official uniform, but as far as I'm concerned, Juliette Low would be proud. After all, the first Girl Scouts made their own uniforms.
Fun patches can be layered, or overflow can go elsewhere. Scroll down for more info.
EDIT: I had planned to eventually turn my daughters' vests into quilts. Or something. But I've since decided to go with a "patch blanket." See the next section for details.
Check out this gorgeous quilt someone made:
Randomly Googled image. Isn't is pretty?
Here's another one, where they added the vests, too:
You can tell a lot of love went into these!
But if you don't want to go quite that far, you can just stick with patches, on a patch blanket.
What Is a Patch Blanket?
A patch blanket is a great alternative for girls who prefer sashes, or who like to collect souvenir fun patches, and/or when a vest is full. Typically the blankets are full-sized (at least 50"x60" or larger; I would go with a full-sized blanket if possible, or at least a twin-sized). While fleece is a popular material, many of the "anti-pill" types of fleece fabric tend to be thinner, and not as warm. Thicker fleece will pill over time, even if washed in cold on delicate (the friction caused by other materials in the wash can contribute, even the friction of patches on the blanket can cause pilling as well). So a good alternative is sweatshirt material. You can find sweatshirt blankets at many sporting goods stores, or even Amazon, but they aren't cheap. Or you can purchase sweatshirt fabric and make your own blanket.
Sweatshirt fabric is typically a cotton/poly blend, with the cotton layer on the outside (where you'd put the patches), and the poly fleece on the inside.
My suggestion would be to get either an anti-pill fleece, double amount of fabric (so you can sew a back onto it when the blanket is full), and don't worry about any pilling, or buy sweatshirt fabric (you could double this as well if desired later on).
The best thing about a patch blanket? You can take it to camp! :)
Here is one blog entry about a family who created patch blankets.
That is one impressive collection of fun patches!
The key is to remove the old patches from previous vests (if desired), and basically play Tetris as you go with the blanket. I always hand-stitch patches now, because it's so much easier to remove them.
Keep in mind you do NOT want to iron a patch on a polyester/fleece material. It can melt the fabric! So if you're not great with sewing, definitely use a cotton (or blend) fabric instead. Adding adhesives can make the patch areas stiffer though, so plan on using a separate piece of material (or second blanket the same size) as backing.
EDIT: Another option for extra patches is to create a vest "cape." I found a picture! See below. One very clever leader who bought a second vest for her daughter, clipped off the front pieces, and sewed the top back/neck area to the top back/neck area of the original vest. This created a blank cape (additional flap of material over the back of the vest), so she can add more fun patches on it. I love it! Such ingenuity!
Yay! Here's a picture. Clever mom!
Okay, So How Exactly Do I Remove Fun Patches from a Vest/Sash?
If it's just stitched on, turn vest inside out and carefully snip the thread holding it in place. Be careful not to cut the fabric. Older badges like Try-Its have edges that fray easily, so be careful when pulling the them off.
If it's ironed on, or if you've used Badge Magic, turn vest inside out, put a washcloth between it and your ironing board (otherwise a patch can stain your board cover fabric), and iron the inside back of the vest for about 20 seconds or so to melt the adhesive. Flip the vest over, and the patch will peel off. However, it will likely leave adhesive residue behind. So. . . .
I Pulled off the Patches to Rearrange Them and There's a Nasty Glue Residue! HELP!
Despite what Google says, do NOT use fingernail polish remover on your vest. It will destroy the fabric. Ditto with Goo-Gone and WD-40. Do NOT use these products on the vest. They will leave behind an oil-based stain that is worse than the white adhesive residue. The Badge Magic site recommends something called
"Goof-Off" but I have never tried it.
If you have tried it and it worked and didn't leave a residue, please leave a comment below to let me know!
Instead of trying all kinds of science experiments with the vest to remove residue, sew the patches where you want them, and remove all pins (including tab) from the vest. Then take it to your local dry cleaners. They will be able to remove the white sticky residue (whether it's from Badge Magic or just the iron-on backing from the patches). There may still be an outline or impression from where the patch was originally placed, but it will look ten times better, and likely won't show up in pictures.
When it doubt, let the professionals handle it.
And this is why I pretty much no longer iron on patches at all. I hand- or machine-stitch everything now. I hand-stitch all the fun patches, because it's easier to pull out those threads if I have to play Tetris with the vest, than it is to remove machine stitches. But machine stitches are good for patches that are right next to each other evenly, like troop numbers. See below for more info.
Some Helpful Hints About Badges and Patches, and Getting Them to Stay Put
If you only iron them on, there's a good chance they'll fall off. I don't care how carefully you iron them on, some of them just fall off, especially if they've gone through the wash a few times. The best solution in my experience is to sew them on. However, not everyone likes to sew (if it's a case of not knowing how, Google is your friend. There are tons of intro tutorials on YouTube as well). Your local dry cleaners will charge you per patch to sew them for you (and there's no guarantee they'll put the patches in the right place, plus some charge $2.00 or more per patch, which is more than a lot of the patches cost in the first place!). I'd ask around and see if there is someone in your troop or service unit who might be willing to do it cheaper, if you cannot.
Don't like to Sew? Here Are Some Adhesives
Badge Magic and similar adhesives can work better than simply ironing something on (and can be easier, especially if you get the pre-cut kind), but typically this stuff isn't cheap. And it can leave behind some serious residue, if you ever need to move a patch. Your local council shop will likely carry this product, but you might also be able to find something similar (but less expensive) at a fabric or craft store. The idea is to stick the patch on the sheet, peel the patch plus stickied bit from the sheet, stick the patch on the vest, and toss in the dryer (remove pins first!). Do NOT iron on Badge Magic. It mucks it up and the patch will fall off.
Here are some specific directions.
Whether you're ironing or using adhesive, wash the vest first. It will remove any fabric treatments and make it easier for sticky stuff to stick.
Fabric glue is messy. And in my personal experience, doesn't work any better than just ironing the darn things on. But I have friends who swear by it. Maybe I'm doing it wrong. . . .
But in the End, Sew It on. Here's Why:
So, what is my preferred method?
Glue Dots and thread. Oh yeah, and a needle (and thimble. There are some thick patches out there!).
 +
+
Why the Glue Dots? They're so much easier to hold a patch in place than using a pin. I don't iron on hardly any patches at all anymore. I cannot tell you how many times I've had to pull off a patch/badge and move it, to make more room for others. My youngest daughter is a brand new Daisy, and has already been working on some independent fun patches for her vest (JGL Birthplace visit, etc.). When my eldest started Daisies, I put LOTS of room between fun patches, because I had no clue how many she'd earn.
Now I know better: I start at the bottom of the vest (both my girls have long hair), on the far left side next to the seam, and put a glue dot on the back of the patch, then hand-stitch around the patch. And I put the next patch right butt-up-against the first, and continue on until I hit the seam on the right side, then the next row begins with edges against the bottom row. No space at all in between the patches if possible. Otherwise I'd have to pull them all off and redo, to make room next year. (Love that last-minute "Oh yeah, I forgot about saving room for the cookie donation patch and look, it's ginormous! Yay. . . ? Oops" moment. It's like Tetris for grownups.)
But if you prefer to iron on your patches (either before you hand- or machine-stitch them, or just in lieu of sewing at all), you can use a glue dot to hold it in place first. That way when you flip it over to iron the back part, it won't scoot off to the side. The glue in the glue dot will melt into the fabric (just like the adhesive on the back of the patch can do) so use a piece of fabric (I use an old baby washcloth, because it's thin and small) between vest and iron so you don't get glue on your iron. The dot will leave a mark on the fabric if you have to move it later. But it's not a huge mark (I use the minis), and it's easy to cover up with another patch if need be. (But be prepared, even with the added glue from the dot, over time the patch may start to lose its adhesion if all you did was iron it on.)
Glue Dots can also melt in the dryer, but it's not going to make a mess. At worst, it'll leave a small dark stain on the inside of the vest. No one sees the inside anyway though. Thankfully. ;)
Check the bargain bins at your local craft store. But trust me, Glue Dots are so great for so many things (the mini ones are tough for little Daisy fingers to handle though -- go with a larger size for craft use), you won't use them just for keeping patches in place.
Some people like to use
flat irons (hair straighteners) to iron on their patches. That is so cool! But I'm not sure how it works once you get to the middle of the vest. I bet they'd work well for sashes though. I haven't tried it (successfully). Worth a shot if you have one though.
Be careful when using a machine to sew on older patched though, like Try-Its. They tend to have frayed edges, and a zig-zag stitch might be great! Or it might be a mess. I hand stitch those carefully. You can also use clear fingernail polish on the edges (before sewing, obviously), so I've been told. Try this at your own risk. I haven't a clue if it works.
I'd be inclined to try
this first. Haven't tried it though.
Let me know if you have (or another de-fray trick) and if it worked!
Keep in mind, too, if you're using a sewing machine, that some patches have very thick border edges. I actually broke a needle once trying to sew through the edge. Do not do this. Instead, pick a color thread to match the background of the patch and sew on the thinner portion next to the border instead. Or use transparent thread.
Here's one mom's experience with it. Adjust the tension on your machine as needed. Experiment with an old patch on spare fabric first.
See? That's one thick outer edge there. I'd hand-stitch that sucker, personally.
Some people layer their fun patches on the back of vests/sashes (please don't do this with official badges on the front though). They sew just the top edge of the patch, then another above on top of it, but graduated, like flaps or fish scales. Or they overlap the patches as a whole so the edges don't show on some. Obviously this doesn't work well if you're ironing them on.
An example of overlapping fun patches
When it comes to fun patches, you do what works. But trust me, if you're planning on doing a lot of activities and service unit/council events with your troop, you'll want to start at the bottom, put them as close as possible, and go from there.
Ditto for badges on the front, too. Don't start at the top, near the bridging rainbow. Start at the bottom inner seam of the vest and move up.
It's okay to turn an official triangle badge upside down to make it fit, if there's no writing on it. BUGS, for example, is a good one to turn upside down if need be. But only official, earned badges should go on the front. Everything else goes on the back.
Start them on the bottom, right by the hem and inside/opening seam.
Some people like to make designs with the triangles. That's fine (see Try-Its image). But if you're working on more than a handful, better to start at the bottom and go out and up. There is no rule about how they fit (except the Journeys are designed to go in a set pattern, if possible).
What About Pins?
A quick and easy trick to keeping pins secure is to take a very small piece of felt and place it behind the inside of the vest, between the vest (with pointed pin part stuck through vest and felt) and the clasp. Helps the clasp grab more securely if there's some kind of bulk to the fabric (which there isn't a lot of in typical GS uniform pieces).
Or if you want to get really creative, you can superglue the felt to the back of the pin itself (stick pointy bit through, and glue it just next to the pointy bit, so there's some room left for stitching), then sew the felt part to the vet itself. Put the back clasp on, and ta-da! It might not fall off. Or you can glue an additional piece of felt to the back clasp, and sew both pieces of felt to the vest.
Or something.
That's a lot of work. So I have not done it. I've found that the one tiny piece of felt, just stuck in between the vest and the clasp, works just fine.
Some people just superglue everything. I'm lucky not to glue my fingers together, so I avoid this when possible. ;)
Do NOT use a glue gun though. That's just a hot mess. HA! Literally. It is. Glue Dots are your friend.
Anyway, for the WAGGGS and membership pins on insignia tabs, don't worry about adding felt. Just pin them through the tab AND the vest, too. That typically adds enough bulk for the clasp to hold on tight.
All this is moot, however, if you happen to get a lemon for a pin. If you end up with one of those pins whose pointy bit breaks off when someone sneezes, just take it back to your council store. They should replace it free of charge.
Also, ALWAYS check your pins when buying for your troop. Especially higher awards (Bronze, Silver, Gold). Make sure the clasps work. The last thing you want is to discover a pin is faulty, in the middle of an awards ceremony.
Edit: I've since purchased locking pin backs (you can find some really good bulk deals on eBay, but Amazon carries them too). And they are far superior to any other pin solution, IMO. Well worth the money, especially for those irreplaceable pins. It won't help if the pin breaks, but it will help it stay on the vest far better than the regular pin backs provided.
So there you have it! Everything you ever wanted to know about uniforms and what goes on them. Hope that helps.
Next Up: No idea. ;) Stay tuned! I'm sure it'll be fabulous.


.JPG)


.jpeg)
